I listen to a podcast about pens. A weekly podcast about pens. Yes, there really is enough pen related news to have a weekly podcast. So much stationery related content in fact, that there are dozens (dozens!) of websites and blogs dedicated to the wonderful world of pens, pencils, paper and ink! Over time, I’ve slowly branched out from a few core pen blogs to more than I can name off the top of my mind. I decided to make Nibbler, a free, little iOS app for aggregating pen and paper news.
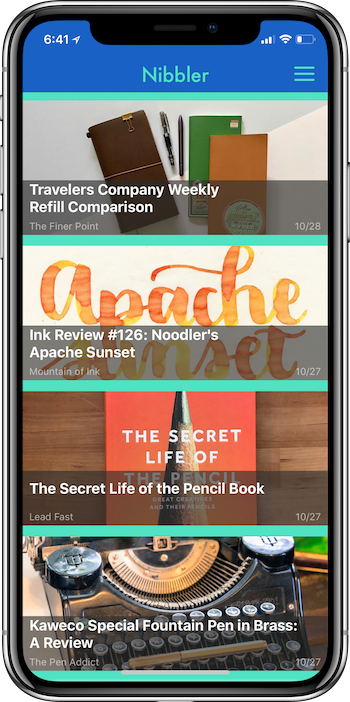
Why make a pen news app? I could easily add all of these sites to an RSS reader, just like I do for all my tech news sites, but it just didn’t feel right to me. A lot of the posts from these pen blogs often feature well composed images of the shades of a new ink, the body of a fancy pen, etcetera. Most of the RSS readers I’ve had experience with on iOS don’t do a great job at showing off these pictures while browsing through posts. They also take out a lot of the stylized flair that gives the site its character. While browsing through the posts from dozens of pen blogs, Nibbler presents the leading image of each post. I’ve found some of the photos lead me to tap on posts I normally wouldn’t have an interest in (I might have a budding pencil attraction).
So, how does it work? At launch, Nibbler pulls in RSS feeds from two dozen pen, paper, and pencil blogs. Each of these RSS subscriptions can be toggled on or off, so if you are just sick and tired of looking at Ed Jelley’s beautiful photography (I do not think this is humanly possible), you don’t have to.
With all of the RSS posts loaded, a nice visual feeds shows off each post’s leading image and title. Tapping on a post opens up a full web view of the article, showing off the complete website. If the user prefers, Safari’s Reader Mode can be enabled, which simplifies the page, showing just the article text and allowing the user to set a preferred font and background color.

Apart from Reader View and subscription preferences, there are also themes and alternate app icons! Colorful, ink inspired themes and icons (a dark mode too)! I’m a big fan of apps with dark modes and the ability to make small tweaks. When making Nibbler, I knew there had to be a variety of themes and alternate icons to pick from. Also, as a pen person (dare I say addict?), I switch inks out of my pens depending other the weather, of course I’m going to want to change the way my app looks. The themes are based off of some of my favorite inks, and I will be adding more in the future. All current and future themes/icons are unlockable via the Nibbler’s only in-app purchase for $1.99 (I need a way to feed my habit, okay?)
I’m fairly new to iOS development and Nibbler is my first real app in the App Store. I’m a little nervous putting it out there. It’s something I’ve put dozens of hours into. I hope that people will like it and find it useful, discovering new pen blogs and enjoying the way the app works. I’ve loved working on this app, and could continue pushing out the release forever, continually adding new features, telling myself that it’s not quite ready yet, but I think it’s at a good state for a 1.0. If you find any issues, have an idea for a feature, or would like an additional blog added to the feed, send me an email or reach out to me on Twitter.
You can find Nibbler on the App Store.
